Choose your settlement architecture
Your first technical decision in building native stablecoin infrastructure is choosing how you handle the underlying funds. This choice dictates your compliance burden, your operational complexity, and your level of control. You generally have two paths: custodial settlement or non-custodial (self-custodied) infrastructure.
Custodial settlement means you rely on a third party to hold and manage the stablecoin reserves. Providers like Circle or Stripe offer APIs that handle the heavy lifting of compliance and custody. This is the fastest route to market. You trade control for speed. It is ideal if your primary goal is to integrate stablecoin payments into an existing product without building a treasury management team. The trade-off is that you are dependent on the provider’s uptime and their regulatory standing.
Non-custodial infrastructure places the keys in your hands. You build or integrate middleware that interacts directly with the blockchain. Platforms like Bridge and Rain provide the API layer to manage these interactions, but you retain ownership of the private keys. This approach offers maximum flexibility and lower long-term transaction costs. However, it requires significant engineering resources to manage key security, wallet infrastructure, and smart contract audits. If a key is lost or compromised, there is no customer support to reverse the transaction.
The clearest split in the market is between these custodial settlement APIs and non-custodial middleware where you own the keys. Your choice should align with your risk tolerance and technical capacity. If you are a startup moving quickly, start custodial. If you are building a long-term financial platform where control is paramount, build non-custodial.

| Feature | Custodial (Managed) | Non-Custodial (Self-Custodied) | Best For |
|---|---|---|---|
| Key Control | Provider holds keys | You hold keys | Speed to market |
| Compliance Burden | Lower (Provider handles AML/KYC) | Higher (You manage compliance) | Regulatory ease |
| Technical Complexity | Low (Standard API integration) | High (Wallet/key management) | Existing dev teams |
| Cost Structure | Higher per-transaction fees | Lower (Network gas only) | High volume |
| Risk Exposure | Counterparty risk | Operational/security risk | Risk tolerance |


As an Amazon Associate, we may earn from qualifying purchases.
Integrate issuance and conversion APIs
You cannot build native stablecoin infrastructure without connecting your application to the rails that move value. This means wiring up two distinct but related systems: issuance (creating the token) and conversion (swapping fiat for stablecoin and back).
The most efficient path is to use a unified API provider like Bridge or Eco. These platforms handle the regulatory heavy lifting and blockchain complexity, exposing simple endpoints for your developers to call. This approach prevents you from building fragmented, fragile connections to individual issuers and exchanges.
Below is the standard workflow for integrating these services into your application.
Start by registering with a stablecoin infrastructure provider. Obtain your API keys and switch to their sandbox environment. This isolated environment lets you test issuance and conversion flows without moving real money or exposing your production keys to risk. Verify that your sandbox balance is sufficient for testing scenarios.
Before issuing tokens, you need a way to fund them. Integrate the provider’s fiat on-ramp API to accept bank transfers or cards. This converts user fiat into a reserve balance. Similarly, configure the off-ramp to allow users to withdraw stablecoins back into fiat. Ensure your integration handles webhook notifications for transaction status, such as "completed" or "failed," so your app can update the user interface in real time.
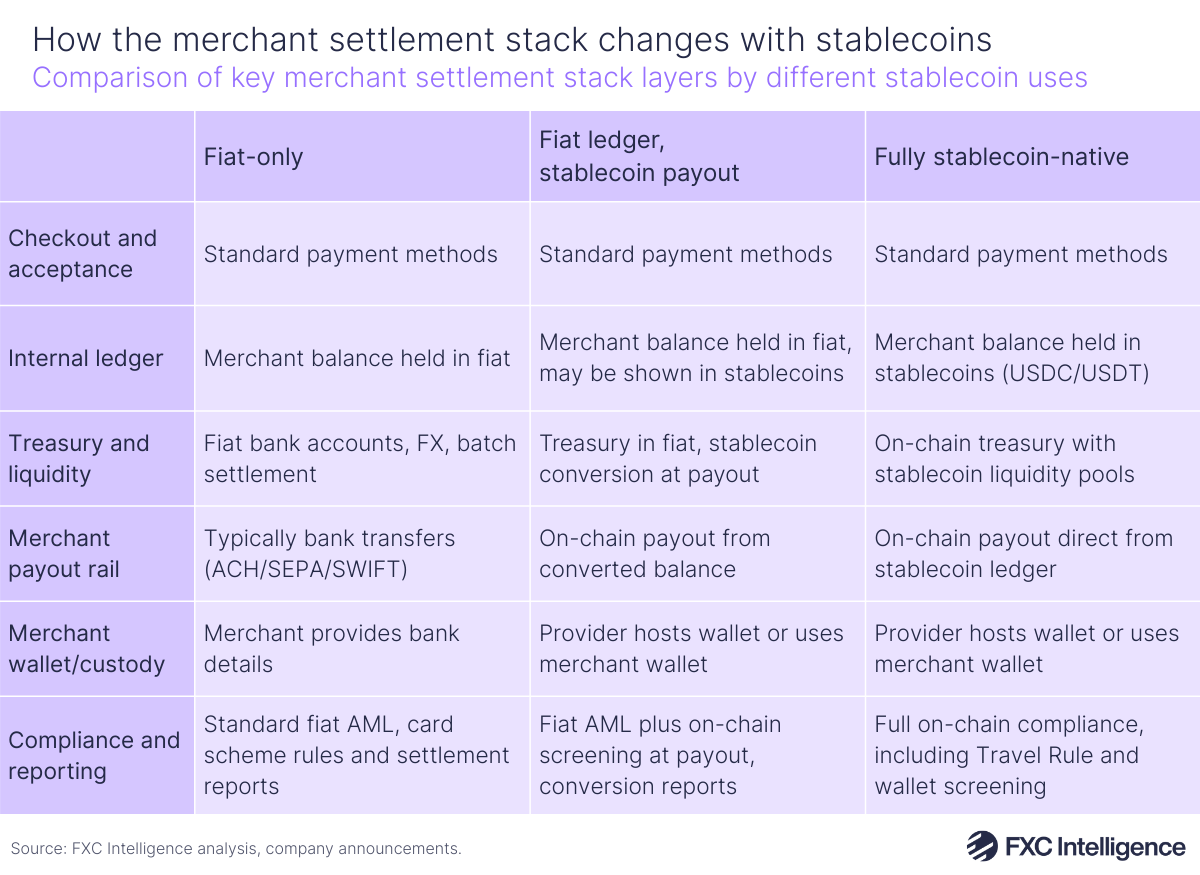
With funding rails active, connect the issuance endpoint. When a user deposits fiat, your backend should call the provider’s API to mint the corresponding stablecoin amount to the user’s wallet address. This step ties the fiat reserve directly to the on-chain token. Make sure your system records this minting event in your internal ledger to maintain an accurate record of user balances.

For payments or transfers, you often need to convert stablecoins back to fiat or between different stablecoin types. Integrate the provider’s conversion API to execute these swaps at current market rates. This step is critical for merchants who want to receive payments in stablecoins but settle their books in fiat. Ensure your API calls include slippage protection to avoid unfavorable exchange rates during volatile market periods.
Run comprehensive tests covering both happy paths and edge cases. Simulate a full cycle: fiat deposit → stablecoin issuance → payment → stablecoin conversion → fiat withdrawal. Check that your internal ledger matches the on-chain reality and that webhooks fire correctly at each stage. Only after passing these sandbox tests should you switch your API keys to the production environment.
Design for cross-border efficiency
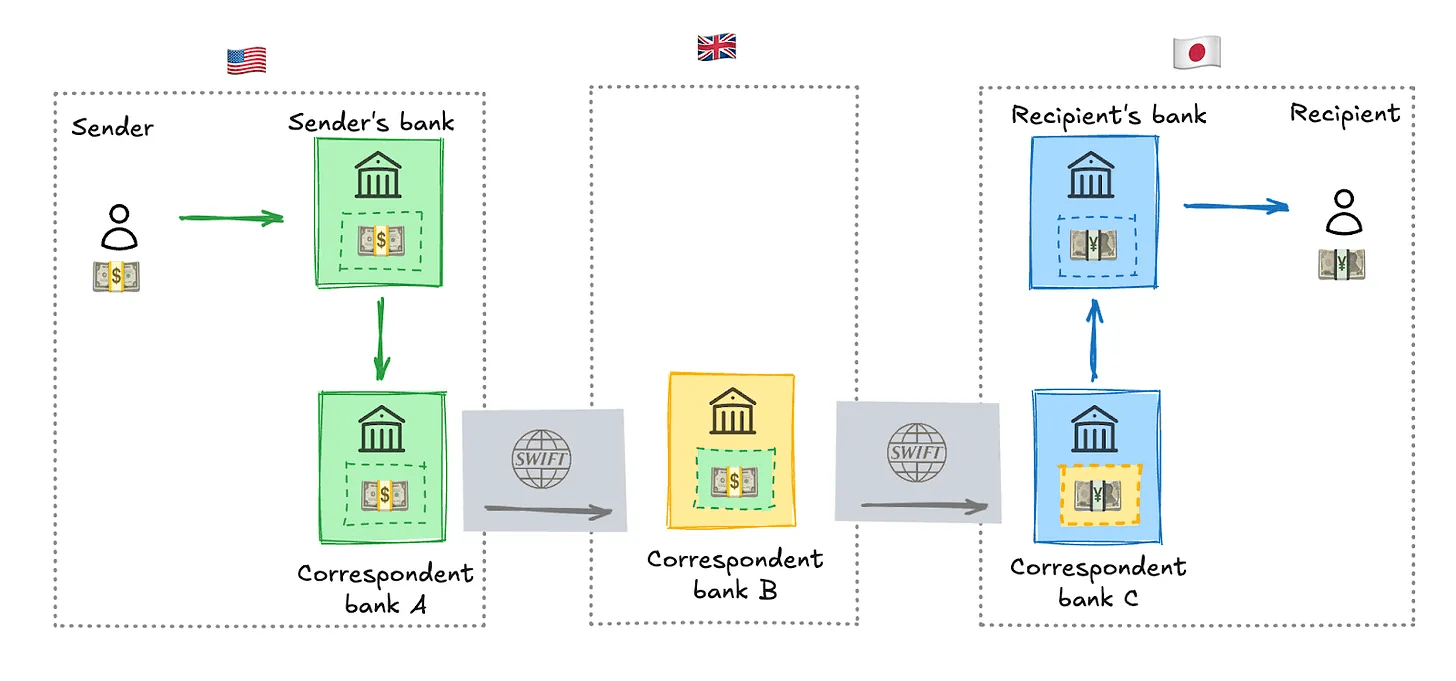
When you build native stablecoin infrastructure, the goal isn't just to move money; it's to make it move like data. Traditional cross-border payments often suffer from fragmentation, where funds sit in correspondent bank accounts for days, incurring multiple fees at each handoff. Native stablecoins bypass this by settling directly on-chain, reducing the number of intermediaries to near zero.
To achieve this efficiency, you need to treat your stablecoin rails as a primary settlement layer, not a secondary option. Start by integrating wallets that support direct fiat on-ramps and off-ramps. This allows users to enter and exit the ecosystem without friction. According to research from BVP, native stablecoin equivalents can now leverage wallets and cards to monetize like banks, earning interchange fees while providing instant settlement [src-serp-3].
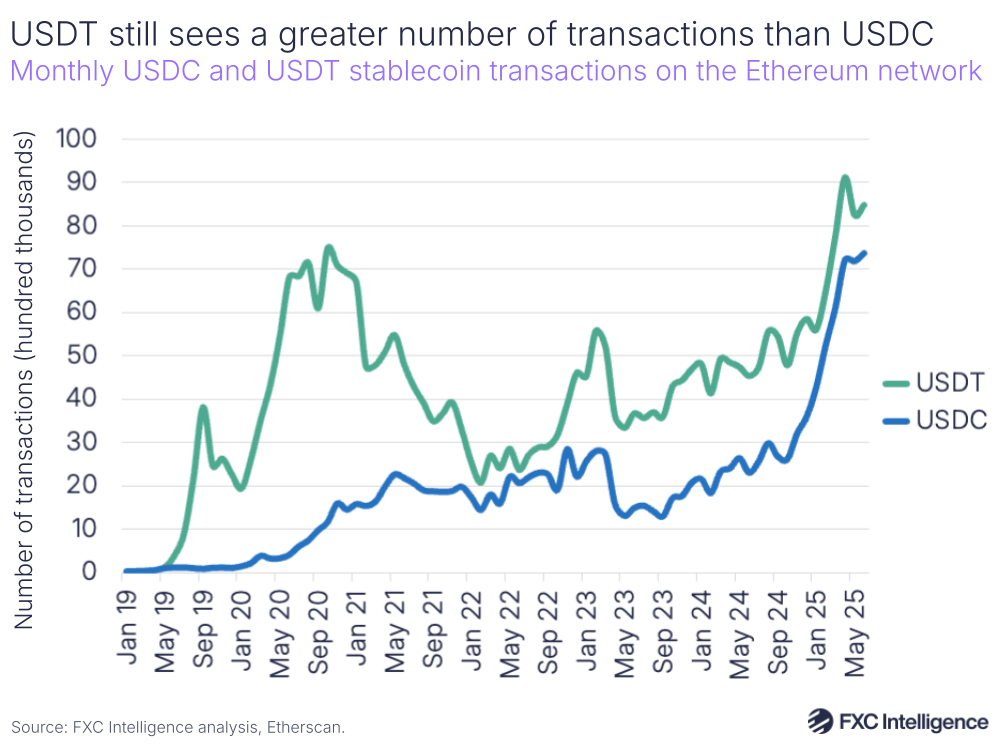
Second, prioritize multi-chain compatibility. No single blockchain dominates all regions. By ensuring your infrastructure can bridge assets across major networks (like Ethereum, Solana, or Layer 2s), you give your users the flexibility to choose the lowest-cost route. This reduces the "spread" between what the sender pays and what the receiver gets.
Third, automate compliance at the protocol level. Instead of manual KYC checks for every transaction, embed wallet screening tools that flag high-risk addresses before the transfer initiates. This keeps your operation clean without slowing down the user experience. As Morgan Stanley notes, stablecoins are fundamentally digital tokens designed to maintain stable value, making them ideal for predictable, high-volume cross-border flows [src-serp-5].
The result is a system where international payments feel as instant as sending an email. By removing the banking middlemen and automating the guardrails, you create a infrastructure that is not just cheaper, but genuinely faster.
Implement compliance and risk controls
You cannot run a high-stakes stablecoin network without a compliance layer that rivals traditional banking. Investors and regulators demand that every transaction is traceable and that the entities moving funds are verified. This section covers the KYC/AML checks and transaction monitoring systems you must integrate into your native stablecoin infrastructure.
Verify identities before minting
Before a single token is minted or transferred, your platform must perform robust Know Your Customer (KYC) checks. This involves verifying the legal identity of users against government-issued IDs and checking them against global sanctions lists. Without this gatekeeping, your infrastructure becomes a liability rather than a financial tool.
Monitor transactions in real-time
AML compliance requires continuous monitoring of on-chain activity. You need systems that flag suspicious patterns, such as rapid movement of funds through mixing services or transactions linked to illicit addresses. Real-time monitoring allows you to freeze assets and report anomalies before they escalate into regulatory breaches.
Checklist for compliance integration
-
Integrate identity verification APIs (e.g., Sumsub, Jumio)
-
Connect to sanctions screening databases (e.g., OFAC, UN Sanctions)
-
Deploy real-time transaction monitoring software
-
Establish automated reporting workflows for suspicious activities
-
Conduct regular third-party security and compliance audits
Test the settlement flow end-to-end
Before you go live, you must verify that your native stablecoin infrastructure handles transactions correctly under realistic conditions. This means running full integration tests on a testnet to catch logic errors, latency issues, or gas estimation failures without risking real capital.
Start by simulating the complete lifecycle: minting, transferring, and settling a payment between two independent wallets or merchant accounts. Use the testnet faucets provided by your blockchain provider to fund these accounts.
Deploy your smart contracts to a designated testnet environment (e.g., Sepolia for Ethereum, Goerli for older networks, or a local Hardhat node). Ensure all contract addresses are recorded in your configuration files.
Use a script or dashboard to trigger transactions: send stablecoins from a user wallet to a merchant contract, then trigger the settlement logic. Verify that the balance updates correctly on both sides.
Test failure scenarios: insufficient funds, expired approvals, or network congestion. Ensure your error handling returns clear messages to the frontend and does not lock up user funds.
Measure the time from transaction initiation to final settlement. Compare this against your service level agreements (SLAs) and ensure it meets user expectations for near-instant payments.
Once these steps pass consistently, you can proceed to mainnet deployment with confidence. Always keep a "kill switch" or pause function accessible in your smart contracts for emergency situations during the early live phase.
Frequently asked questions about stablecoin rails
Building native stablecoin infrastructure requires precise technical decisions. These answers address the most common operational questions from developers and finance teams.
No comments yet. Be the first to share your thoughts!